This is the post for the Friday, November 6, 2015 class meeting.
Career Connections Attendees
 Check in with me at the beginning of the session, so I’ll know you need to leave early.
Remix Rubric
I’ve added a rubric to the assignment in Canvas. The numbers may shift around slightly, after I test some scenarios. Notice that the project is worth 90 points. The remaining 10 points are earned for the in-class presentation in December.
Working On Your Mockup and/or Storyboard
Use your time during today’s session to finalize your mockup or storyboard. Use the examples and tools included from Wednesday’s class as you work.
If you already finished your mockup or storyboard, please work on other aspects of your project.
By the end of today’s session, you should have submitted your mockup and/or your storyboard in the "Project 4 Mockup/Storyboard" Quiz.
In-Class Writing
We need to complete this in-class writing slightly differently because of the many different ways you may have created your mockup or storyboard. Choose the option below that fits your work. When you click on the option, full instructions will appear. Follow them to submit your work:
-
Website URL only
- Go to Assignments in Canvas.
- Choose the "Project 4 Mockup or Storyboard" activity, under the Participation, etc. heading.
- Click the big Submit Assignment button on the upper right.
- Click the Website URL tab, and you will see the form below on the page:
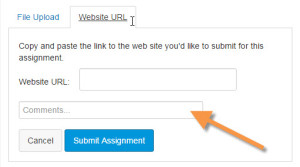
- Paste the link to your site in the Website URL field.
- Click the Submit Assignment button, and your link will be turned in.
-
File upload only
- Go to Assignments in Canvas.
- Choose the "Project 4 Mockup or Storyboard" activity, under the Participation, etc. heading.
- Click the big Submit Assignment button on the upper right.
- Click the File Upload tab, and you will see the form below on the page:
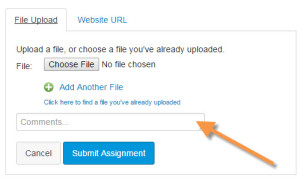
- Click the Choose File button, and navigate to your file.
- Click the Add Another File link if you need to to upload additional files.
- Click the Submit Assignment button, and your work will be uploaded and turned in.
-
Both website URL and file upload
Canvas does not allow you to use both options at the same time, so you will have to write an extra document. Follow these instructions:
- Write a short memo in your word processor that gives me the URL. It can be very short and direct. Just give me the link and tell me what it goes to.
- Go to Assignments in Canvas.
- Choose the "Project 4 Mockup or Storyboard" activity, under the Participation, etc. heading.
- Click the big Submit Assignment button on the upper right. You’ll see this File Upload form:
- Click the Choose File button, and navigate to the short memo you have written.
- Click the Add Another File link to upload additional files.
- Once you have uploaded all your files, click the Submit Assignment button, and your work will be uploaded and turned in.
Homework
For today, do the following:
- If you didn’t complete your "Project 4 Mockup or Storyboard" quiz in Canvas, please use the grace period to finish by 5:30 PM Sunday (11/8).
For Monday, do the following before class:
- Review the information on documentation for your projects in Chapter 4 of Writer/Designer. We’ll talk about finding assets, and you will create a documentation plan for your project.
 These examples show the mockups and storyboards that students created for projects in the past: